


Looking to learn more advanced stained glass skills or one on one private help? Join my Patreon - I dive into more advanced techniques there and you support me in the process of teaching you! (Patreon Link) .
Thank you all so much for joining me on my very first stained glass blog post! I never thought I would ever be writing a blog as writing wasn’t ever my strong suit but here I am giving it a go. If you follow me on social media or know me in the real world then you know I love sharing tidbits of stained glass information whenever I can to whoever will listen! This Glass Goddess blog was born out of my attempt to share what I knew via weekly posts on Instagram but it quickly became obvious to me that it’s more of a visual platform geared towards swiping and tapping and not reading long paragraphs. And let’s face it I can’t keep what I have to say in less than 2,200 words (the character limit) thus this blog was established and I can now write as many words as I desire. Before I start I want to be sure to preface the beginning of this whole blog to say I am not close to being an expert only an artist who has spent many hours making stained glass and has a little bit of knowledge to share. My hope is that this blog can provide a little more information to you and other artists who are looking to try making stained glass. Diving into creating stained glass can seem overwhelming at first glance considering all of the tools it requires and the many steps you must follow. But I’m here to welcome you with open arms and want to be the first to let you know that it is not complicated at all once you break it down. In fact, stained glass is easy enough for anybody to do, it just takes lots of time, tools, and patience!
How do I find or create my own design?
I thought for this very first Glass Goddess blog post I would scratch the surface of getting started with making stained glass by discussing one of the most important parts about beginning your own project. Picking or creating the design! With the very first piece you make it will be likely that you will be using a template that is provided to you by an instructor or online source. If you have limited experience, I highly recommend getting comfortable by using a premade pattern on your first project. There are great resources online that offer free downloadable patterns such as Delphiglass.com, Freepatternsforstainedglass.com, and Glasscrafters.com. There are also many sites that offer patterns you can pay to download.
Pattern Picking
That said it’s important to know not all designs are free game to use (I learned this the hard way and justly so). Unless the pattern you find states that it is free or you have permission from the artist to use it, it isn’t free to use. I know that seems like a no brainer typing it out here but stained glass is a unique art where you first learn by copying somebody else’s design so it can be confusing to know what is okay and what isn’t okay when it comes to patterns if you aren’t explicitly told. Unfortunately when I was first began making stained glass I didn’t think this though/ I wasn’t guided correctly by my instructors (they encouraged us to find patterns on Pinterest or Google) and I made the big mistake of recreating or artists patterns which to this day I still get a pit in my stomach thinking about how I upset other artists. If you know me the LAST thing I would ever want is to upset somebody and I tried my best to make it right by not selling what I re-created, pulling the pictures off my Instagram page, and never using somebody else’s design ever again. So if you have not been told before you start I will tell you now so you can avoid the uncomfortable experience that I went though, please only use free patterns, purchased patterns, or draw your own designs. If you don’t enjoy coming up with designs or you really admire another person’s design you can always reach out to the artist and see if you can recreate their pattern for practice or pay to use their template. Sometimes artists are generous and don’t mind this as long as you do not sell the piece but do respect their decision if they say no.
Creating Your Own Pattern/My Tools
With that all said if you are like me and don’t want to use a pre-made template the next option is for you. If you have already created a project or two and know what glass cuts are possible/impossible I’d say you are fully equipped to start drawing your own designs. Here’s the best part too you don’t have to worry about where you are sourcing your patterns since they are coming from your own head! When I set out to create my own patterns the below are my go to tools with links if you decide to get your own.
*Disclaimer: As an Amazon Associate, I earn from qualifying purchases. Thanks for your support :)
-
Framing Square Ruler (find on Amazon)
-
Pencil and a BIG eraser (trust me you’ll need it)
-
Strathmore Tracing Paper* (find on Amazon)
-
Tracing Box Light ** (find on Amazon)
-
Ideas
*Its good to mention here my method with tracing paper is designed for creating projects under 12in X 12in (mostly sun catchers). With a larger project with you need a different method and tools, which I will briefly explain towards the end of this post.
**Very similar to what I use to trace my designs
Creating Your Own Pattern/My Tools
With that all said if you are like me and don’t want to use a pre-made template the next option is for you. If you have already created a project or two and know what glass cuts are possible/impossible I’d say you are fully equipped to start drawing your own designs. Here’s the best part too you don’t have to worry about where you are sourcing your patterns since they are coming from your own head! When I set out to create my own patterns the
What Should You Make?
Let’s first talk about coming up with a concept for your project. Sometimes it comes to you quickly and sometimes it takes a while to decide. If it’s a very particular gift for a person or you know exactly want to make you can skip this part. If you’re like me then sometimes you need a little inspiration via a brainstorming session. To discover my vision I first create an idea bank. Pinterest is a great online version but personally I prefer to keep an idea folder on my computer, I suppose it’s my version of an offline Pinterest board. I like to save images that I really enjoy (funky flowers, cute animals, Colorado nature scenes, Disney and Miyazaki movie characters, colorful patterns that catch my eye, etc.). If you’re more of an old fashioned brainstormer pull out a pen and some paper and begin a list of what you enjoy or gather pictures from magazines/books. Volià now that you have a list of ideas, it’s up to you to narrow in on the picture or idea you’d like to turn into a glass pattern.
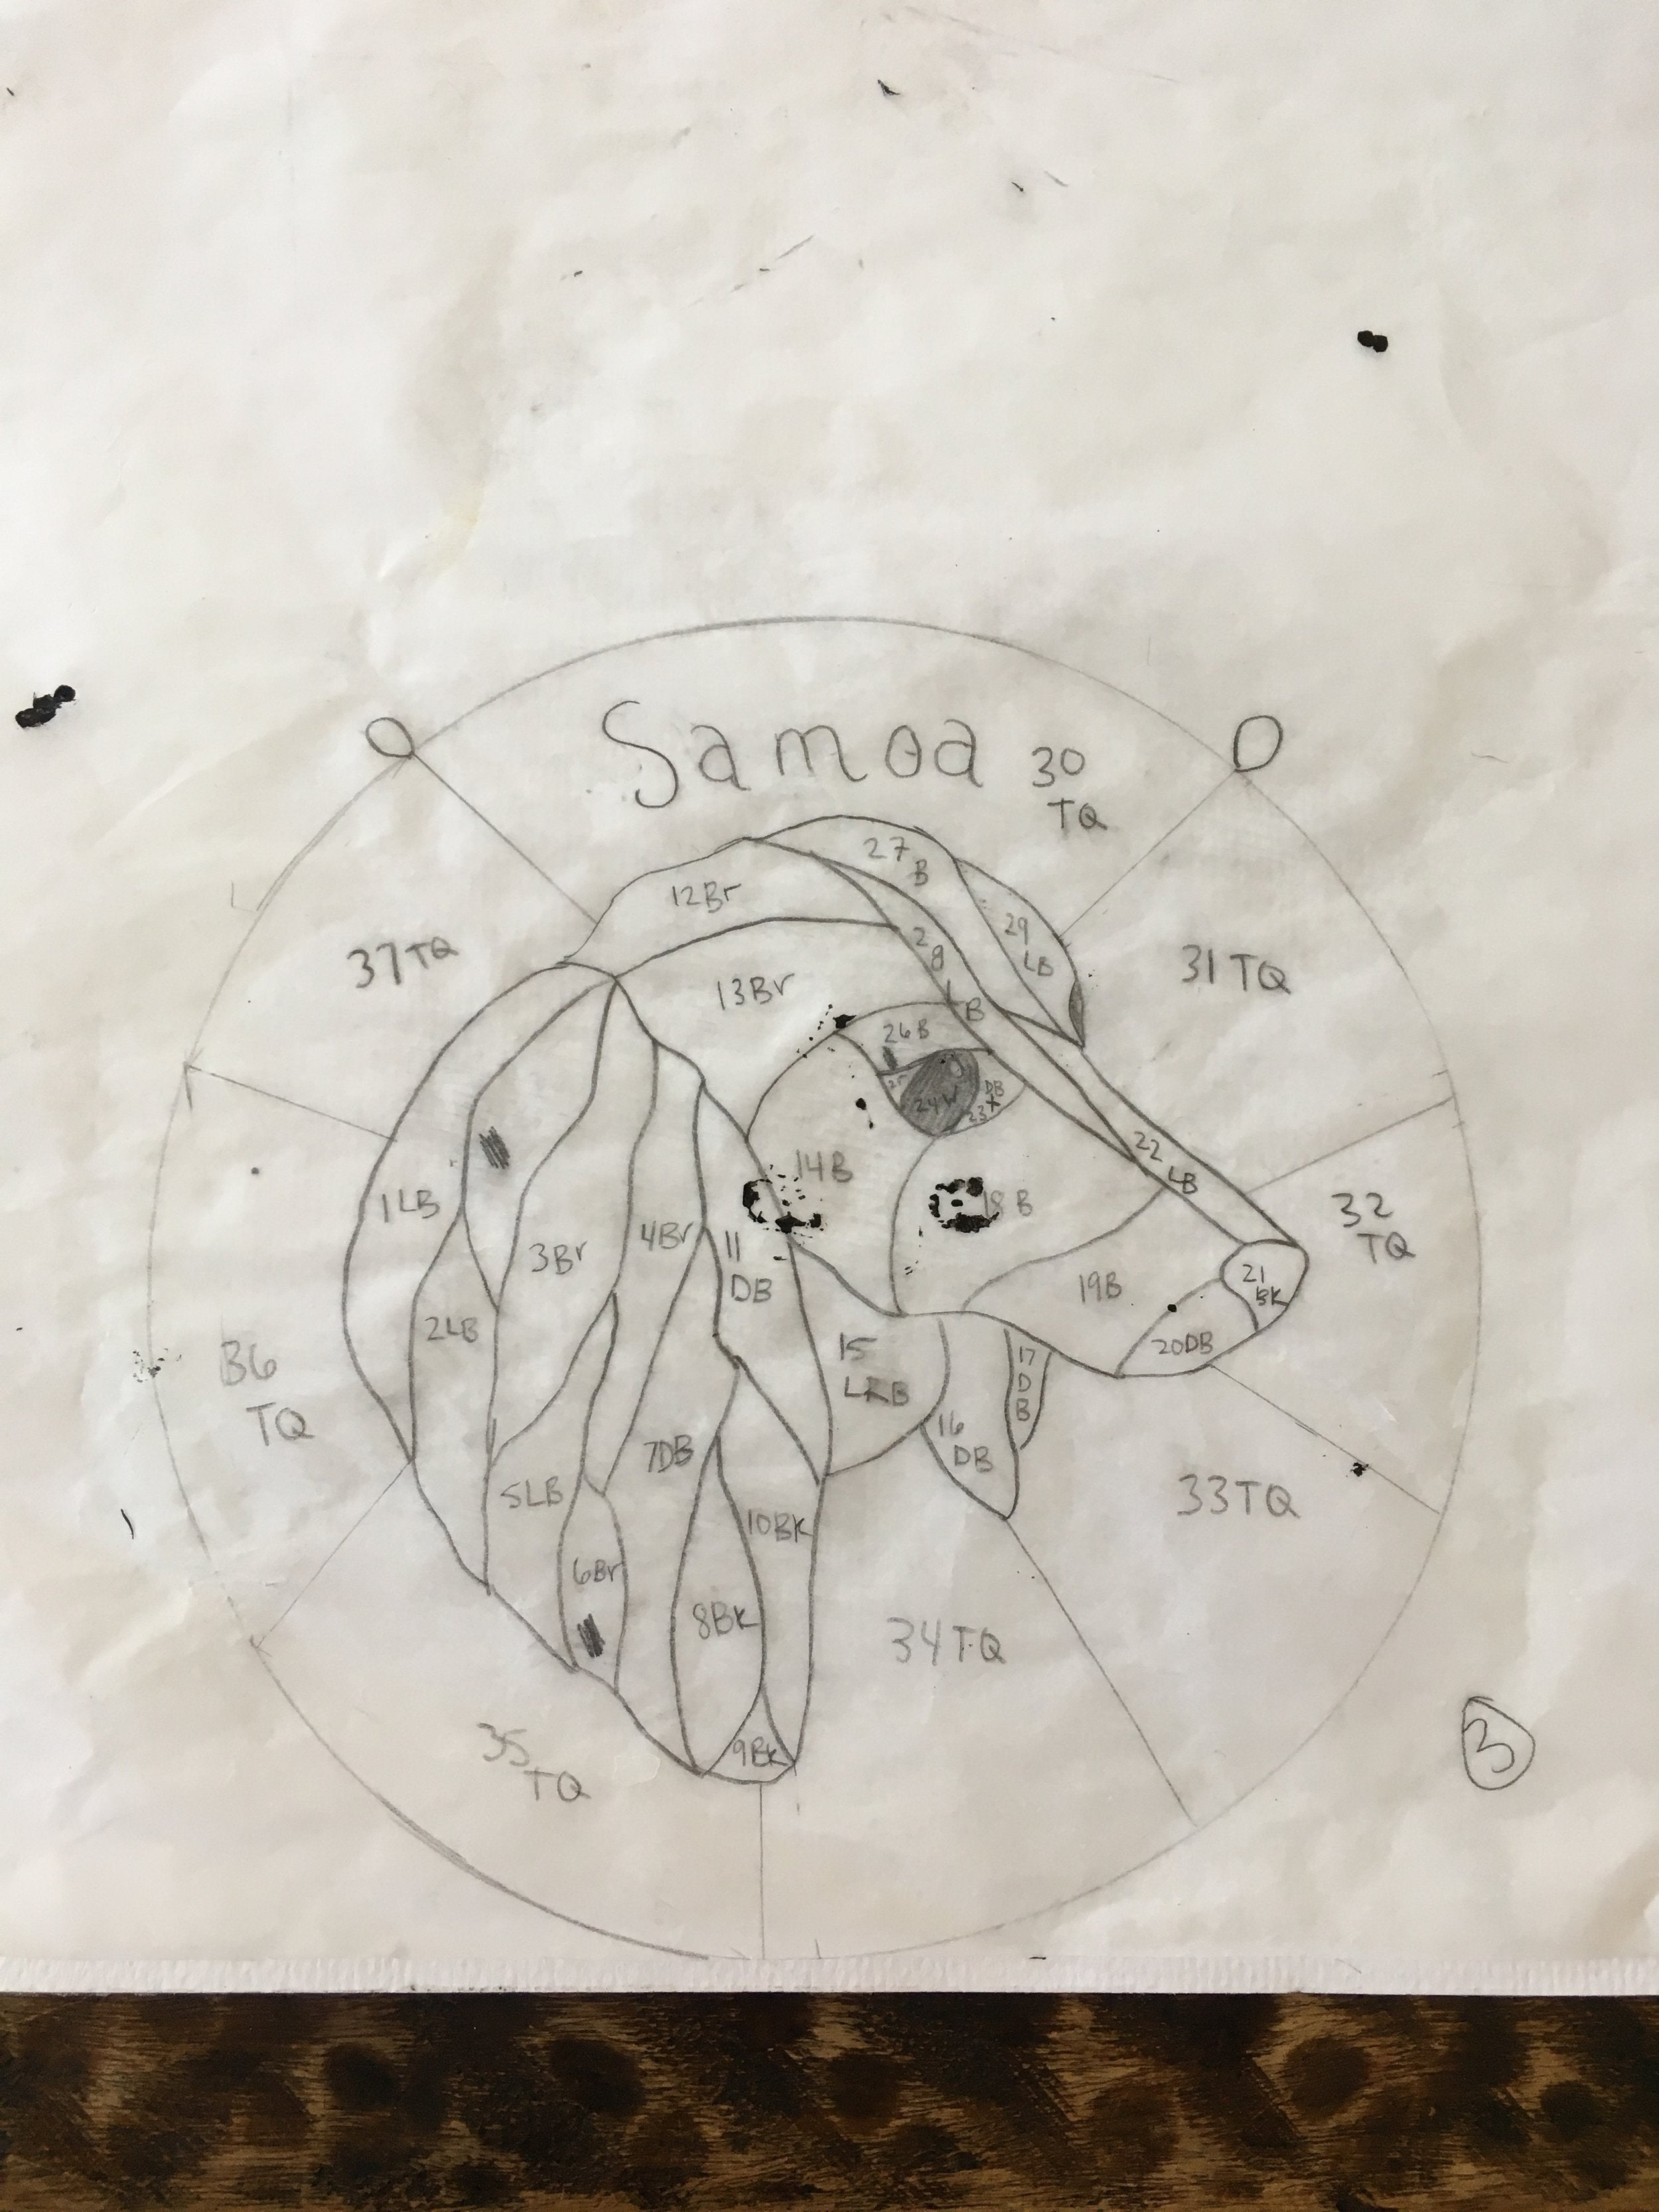
Once you’ve finally chosen you’ll need to decide if you’ll be tracing or free handing your design depending on what you are hoping to create. For sake of visualization see below 2 past examples of designs I made (the Alice in Wonderland inspired freehand template and The Dog Named Samoa traced template). Once you’ve picked how you will create your design now comes the hard part… drawing it. When you start this process it’s important to be realistic with what cuts can be achieved and how many single pieces your pattern has. Think of your design as a puzzle, the more intricate (usually more pieces) the more time it will take to complete. If this is your first time I recommend having less than 30 different pieces.

Free-handing Your Pattern
If you choose to freehand and create a design that comes from your mind it’s time to shoot for the moon and get to drawing. For this method, the Alice in Wonderland inspired template makes for a perfect example. I knew I wanted to have it themed around the cookies she is tempted to eat in the Disney movie. The first thing I did was draw was the shape I wanted the window to be which was tall and long, I wanted the top part to be more rounded and the bottom part to be more square. My framing ruler comes in handy for making sure the height and width stay equal to each other. With design drawing its very important to have exact measurements or your piece is going to come out crooked and it will be noticable. Make sure to re-measure and compare your template several times. Touching back on something I mentioned earlier, this is the reason I draw my designs on tracing paper. I can lightly fold my design to see if it is symmetrical and if it isn’t I can make an easy adjustment!
Once I had the outside shape of my template drawn I then added the subjects of the window, the cookie pieces. After I added in the cookies it was then time to break the design into a stained glass puzzle pieces. To reiterate it is VERY important to know at this point how glass breaks when its cut. A big thing you want to avoid when drawing your lines is drawing interior 90-degree angles. Once you’ve cut glass you will understand it is impossible to hand cut any piece with a inside 90 degree angle unless you have a lovely ring saw to assist you in doing this (find on Amazon)(I don't reccomend investing one until you are selling your work or want to make a large investment they are expensive). Please see the attached pictures below that better explain what I am saying. Another important tip to keep in mind is to try to avoid having several lines meet in one place. Once you get to soldering you will see that the more lines you have meeting the bigger the blob of solder will sit at that joint and it won’t look very nice. Ultimately the lines you decide to add and where you add them are completely up to you. When I draw templates I will add lines then erase…A LOT. Sometimes it takes quite a bit of guessing and checking to see what does and doesn’t look visually balanced on paper. The most important tip I can give you though is as you go along the process of adding lines make sure look at each individual piece and ask yourself if it is going to be possible to independently cut this piece out. Posing that question to yourself can end up being the difference between having a successful project and having to head back to the drawing board to change your design once you’ve started cutting!


Tracing Your Pattern
When you want to recreate something specific for a stained glass design such as a character from a movie or a picture of your friend’s pet dog, the tracing method is the best way to create this kind of pattern. First it is important to find an image or use a picture you’d like to use and make sure the quality is high. A grainy picture will not be helpful to your efforts because when you begin tracing as its imperative to see where there are existing natural lines and color changes. Another important element you’ll need to know is what size you want your piece to be. Depending on how large or small your project is you’ll need to be sure to print out the picture in the correct sizing. If it happens to be much bigger than what a regular printer can handle you’ll need to go to a local copy store and have them blow up the image size then print for you (such as FedEx/Office Max).
Now that you have a picture that you want to turn into stained glass in the correct sizing it’s time to get tracing. I like to use a light box to help me better copy the image. I place my picture down and then place my tracing paper over it and begin to first trace the outside shape of the image. Following that I will then trace any naturally occuring lines or color changes I see in the picture. If your image is larger than the light box I’d recommend focusing on visually cutting it into halves or thirds then moving your tracing paper as you go in order to copy the whole image. Once I’ve got the rough outlines of the image I then place the tracing and the original picture side by side to compare likeness. If I feel my design is lacking I will go in and add extra lines that I feel will add more shape or capture more of the texture (think for example creating the look of dog hair).
Another tip to keep in mind when you’ve got the images side by side is to look at the lines on the copy you drew and ask yourself are those lines possible to cut in glass? At times when I am tracing over a design I find there are pieces with impossible angles or are pieces too small to cut glass for. The best way to remedy this is to make adjustments as needed which means at times choosing to erase some lines all together or redrawing the lines to make more of an achievable cut. If you are dead set on having the image to match exactly, which there are some great glass artists out there that do this beautifully, please know you will most likely be diving into a big undertaking because you’ll have more pieces resulting in more time, and you may need a ring saw to make your desired cuts. In my opinion I think you can achieve a beautiful stained glass piece by making alternative edits as needed.
Larger Projects
If you’re opting to create a larger project than 12in X 12in you will NOT want to use tracing paper. Your best option is again going to an office supply store and getting your image sized correctly. Be sure to print out one solid copy and if possible print out the second copy on clear plastic paper (think of the kind your teachers used on overhead projectors and drew with Vis-A-Vis markers on). If you’re unable to use clear plastic paper you’ll need to get your hands on some carbon paper/large brown wrapping paper. As a third alternative you can always use the tracing light box to create a second version in pieces. I’ll dive into more of the logistics of pattern tracing/transferring in a future post!
Numbering and Color symbols
Once your design is done it is important to differentiate your pieces from each other with numbering and color-coding. Numbering starting with 1, 2, 3, 4, etc. does the trick for my projects. When it comes to colors I use single letter symbols such as R= Red or PP= Purple. Once these are combined they will appear for example like R1, R2, PP3, PP4, R5, etc. Note* you will need TWO copies of your template because eventually one of the patterns will be used for cutting glass the other will be your pattern guide. Be sure to write letter and number labels on BOTH the cutting template and the guide template as you will eventually use the key to match your pieces back together.

Final Design Thoughts Before Diving in
Yay you’ve almost gotten through the whole process of creating a design on your own. The final question I ask myself when I am close to being done drawing is how am I going to hang this piece? It’s important to ask yourself this question because its best to have this decided before you jump in and truthfully it would be a pure nightmare thinking though it at a later time when you are say in the middle of soldering your project. Looking at my design I glance at the lines I have already drawn up on my pattern to then see where I can integrate one loop hook or two loop hooks. You’ll need to leave enough length on these lines for a small wire to sit on and eventually have lead melted upon it to secure. See the below example. If my design has non-symmetrical points, poor weight balance (heavier on one side than the other), or any other issue that will make hanging difficult I will make sure to go back and redraw the lines. A balanced project is a beautiful project and it is totally worth considering this before you start cutting!

Ready to Create?
Well I think you have all the tools in your belt to be a great pattern designer. Much of stained glass template drawing is trial and error style learning but you will eventually get the hang of it just like I did. There will be times when you run into feeling defeated, heck just last night I crumpled a piece of paper and threw it across the room in frustration. If I can share one final piece of advice to you it is to be patient with yourself. Remember when creating a pattern from tracing or freehand it is hard to keep the images to a perfect likeness. I mean you are basically turning a crystal clear picture into a grainy colorful puzzle. I say this because it is important to have some grace and know that stained glass is supposed to look like a clunkier, shinier, and more tangible version of your vision or picture :).
Thanks for reading if you’ve made it this far! If you have information to add, any questions, or feedback on this post please leave a comment below!
<3 Meggy
stained glass pattern design, how to design stained glass patterns, creating stained glass patterns, free stained glass patterns, stained glass pattern drawing tips, stained glass pattern templates, designing your own stained glass, beginner stained glass patterns, stained glass pattern ideas, stained glass pattern resources, best software for stained glass patterns, tracing stained glass patterns, stained glass pattern numbering, stained glass pattern transfer methods, custom stained glass design, DIY stained glass patterns, stained glass pattern creation tools, stained glass project planning, stained glass pattern layout, stained glass pattern copyright rules, stained glass pattern selection tips, stained glass pattern mistakes to avoid, stained glass design tools, stained glass pattern sources, how to choose a stained glass pattern, tracing paper for stained glass, stained glass pattern techniques, stained glass color selection, pattern fitting for stained glass, handmade stained glass design, where to find stained glass patterns, stained glass pattern safety tips, best books for stained glass patterns, stained glass project preparation, stained glass hanging solutions, stained glass framing tips, stained glass workshop tips, stained glass template making.