


Looking to learn more advanced stained glass skills or one on one private help? Join my Patreon - I dive into more advanced techniques there and you support me in the process of teaching you! (Patreon Link) .
I’m back! Seriously long time no chat and I’m sorry for that, life just got busy for me with holiday orders and moving, phew. I’m so glad to be back at it and I’m super ready to teach you the ins and outs of glass cutting! My every-time disclaimer is I am not a master at this art medium just a gal who is passionate about sharing my knowledge and helping YOU grow into an even more skilled stained glass artist!
*Disclaimer: As an Amazon Associate, I earn from qualifying purchases. Thanks for your support :)
WAIT…I’M SUPPOSE TO BREAK THE GLASS?
Yes you heard that right! You get to break the glass for your project and no it doesn’t come pre-cut! If you've made it to this point don’t let yourself feel overwhelmed because this is where it starts to get fun. In my opinion the most exhilarating part of creating stained glass is the process of picking and cutting the glass. This is the step where your project goes from idea into reality and you’ve got a tangible project that you'll be working to perfect! Lets pick up where my last blog post on pattern transfering left off. At this juncture you should have a chosen pattern, all of your glass is picked, and you’ve either used paper and glued it on the glass or you’ve traced it on the glass with sharpie. Those trace lines or paper cut outs are going to be your guide when you begin cutting and will help you cut the glass out of the sheets you selected. Now lets jump into some specifics on cutting glass!
PICKING THE PERFECT GLASS CUTTER FOR YOU
You will need to use a glass cutter to aid you in cuting pieces out of your glass. This one is going to be a “pick your poison” situation. There are several different kinds of glass cutters and its up to you to test some of them out to see what you like best. Some hold like pencils or some use the placement between your thumb and finger at a downward angle. The image below is a picture of the Pistol Grip Glass Cutter, I personally like it best, but I will list a link to three kinds I’ve used. One (find on Amazon) , Two (find on Amazon) , Three (find on Amazon) . Additionally it will be important to use glass cutting oil as you work (also pictured below, find on Amazon) . Cutting oil helps lubricate your glass cutting tool as you cut. This is a must for having your glass break correctly along the scores (break lines) you create. I use a small container with an oil-soaked cotton ball to dip my glass cutter in after every few cuts as I go. All cutters have built in internal reservoirs to hold the oil but I have found most of the time they leak and make a mess. My version is no mess!


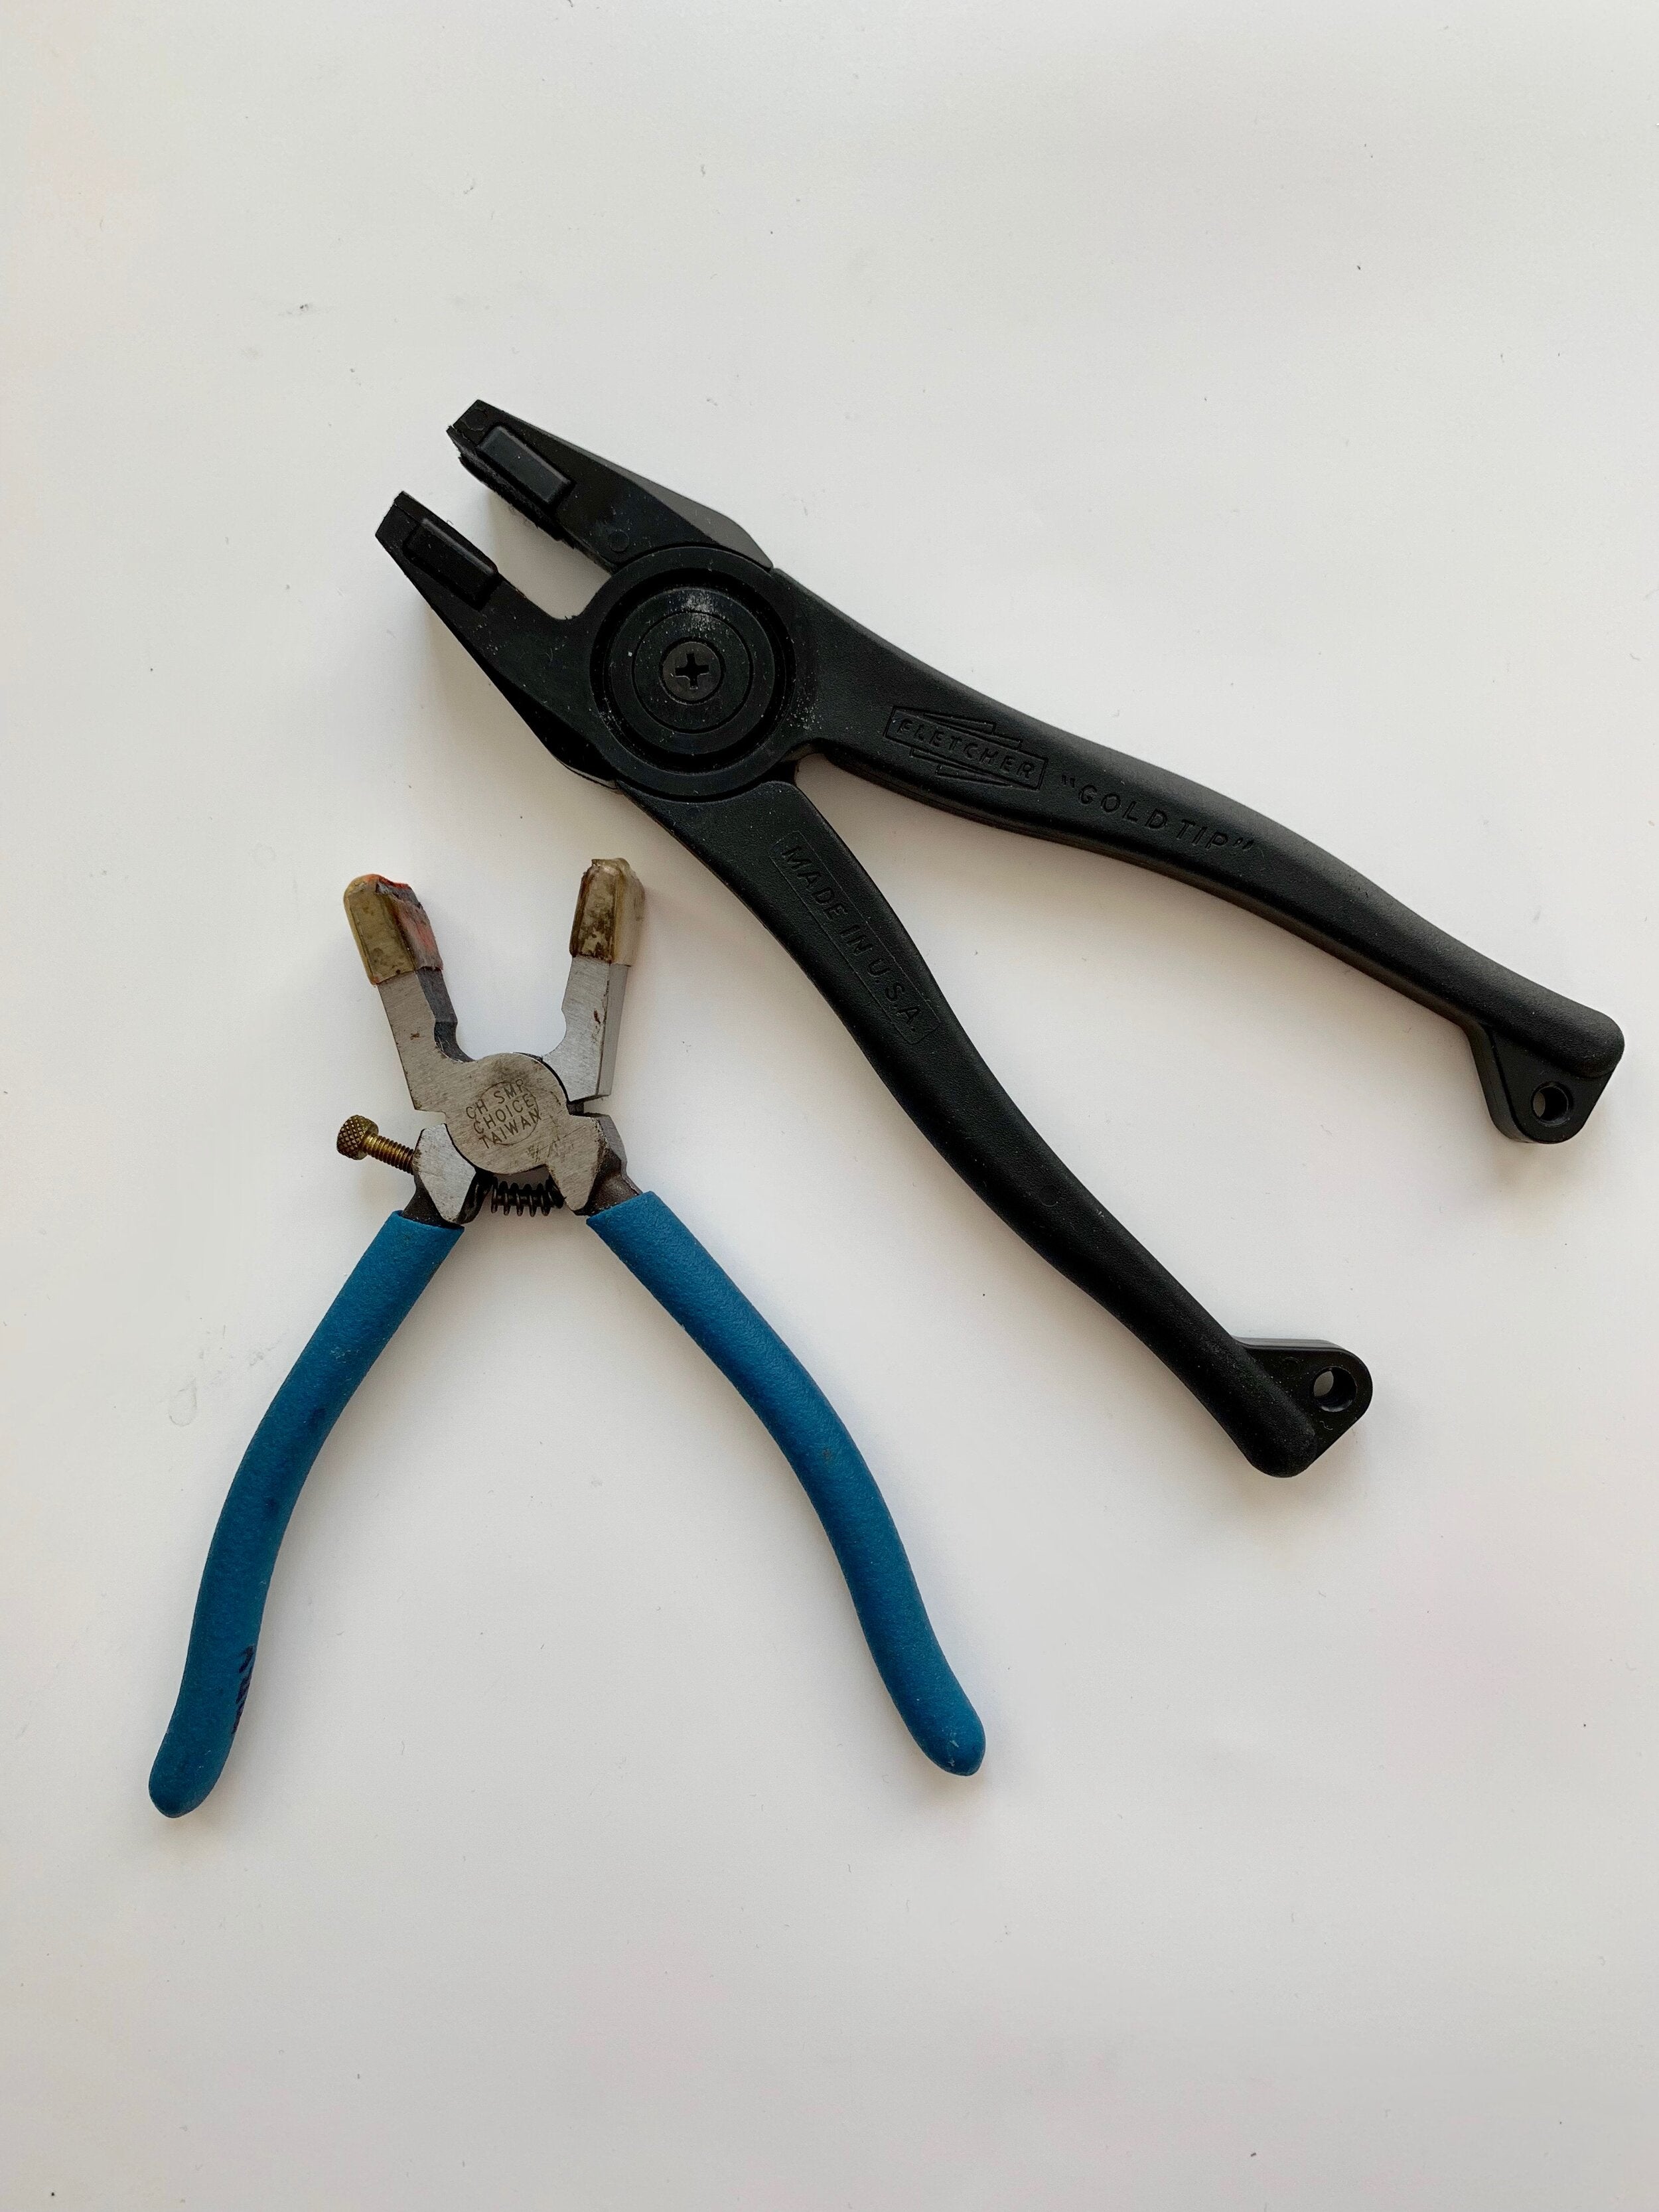
UNDER PRESSURE (PLIERS)
In addition to a glass cutter and oil you will also need a couple different sets of pliers to help you break apart your glass. You are going to want to pick up two different kinds of pliers, running and grozing. Let me explain the difference between the two and why you need both of them. Running pliers (find on Amazon) are the “big mouthed” pliers they are used to help break larger and straight line cuts. If you take a look between the mouth of the pliers you will see either a rubber bumper that sits in the middle of the plier (black ones) or you will see the inside of the mouth is grooved (blue ones). This is because these pliers are meant for creating a even pressure between two sides of a cut. You will line up the pliers with your score line (the pliers have a red line or a mark to indicate the middle) and press, the piece should then break that score line in half. Grozing pliers (find on Amazon) are skinner pliers used for breaking smaller or curved cuts on your glass. If you look at these pliers closely you will see that they have a flat mouth on top and a curved mouth on the bottom, there are no grooves. Instead of having a built in pressure point to help break the glass you will be creating the equal pressure with your thumb and the plier to break the "score" line. When you are ready to break glass using these you will make sure the flat part of the pliers are on the top part of the glass and the curved part always is on the bottom. To help remember look at your pliers from the side they look like an alligator mouth, make sure the curved mouth is ALWAYS on the bottom. You will place these pliers as close to that score line as you possibly can and place your thumb on the other side of the score line. Then you will apply pressure by moving moving your hands upward to create the break. Again you will need both of these pliers so don’t think that you’ll be able to get away with only owning one.


CREATING THE IDEAL BREAKING SPACE
This might sound lame but you will need an ideal surface and space to cut glass well. First off I recommend standing up while cutting and over a waist high table. It will be important for you to be able to use the weight of your body against the glass cutter so you don’t overwork your arm and you don’t want to work hunched over either. When thinking about the surface of that table we want it to be perfectly flat and semi soft. Too soft of a table our glass won't score well and too hard of a table may cause breaking with shards. I sometimes cut my glass out on a wooden table with cardboard on it, I have also cut glass on a lightly carpeted table. Its important to have a surface where your glass wont slide around and you wont be creating pressure from other sources only your glass cutter. I have seen many artists cut over waffle grids. I plan to get one of my own in the future because this seems to be the ideal surface plus you don’t have to worry about cleaning up shards as you go. Speaking of glass shards, as you begin to cut you will need to keep your space clean by sweeping the shards away every couple cuts. If you don’t continuously keep your space clean the shards can cause your glass sheets to unintentionally break due to the pressure points they create. Not to mention you can also get cuts from these tiny shards. So its best to keep as tidy of a space as possible as you create by using little table broom and trash for clean up.

SAFETY…I KNOW…BUT IT IS IMPORTANT
I'm not going to lie to you I am overly paranoid with safety but hey its better to be safe than sorry especially when working with potentially dangerous materials. First safety glasses are a MUST (find on Amazon) ! The amount of people I see not wearing eye protection during glass cutting and grinding is staggering. Please save yourself a trip to the ER and always wear eye protection when dealing with small shards of glass because you never know where they can fly. I can tell you from watching my dad go into the ER after getting a piece of metal removed from his eye it is INCREDIBLY painful and expensive. Also if you want to be extra safe like me wear a mask while cutting to protect from glass dust (find on Amazon) . Over exposure to glass dust can cause Silicosis which leads to future serious lung problems. So save yourself the monetary/physical punishment and just buy some safety glasses and a dust mask they cost less than future medical treatments!
Cutting Glass = shards. No matter what you do you are going to poke and cut yourself while working with glass, its unavoidable. Just remember to keep the first aid kit near by for quick patch-ups. If you are very careful they won’t be big cuts though and thats what is important. For big cuts (fingers crossed that never happens to you) seek help from a medical professional immediately.
HOW TO CUT GLASS THE RIGHT WAY
Now lets chat glass cutting! Sounds intense right? The first thought that flashed into my head when I was a beginner was that I would need a special saw or I would need access to big machinery to do it. That is NOT the case at all! Glass cutting is rather simple it turns out. It consists of taking a small hand tool that looks like a pencil that has a mini wheel along the tip of it then applying even pressure while rolling it across the surface of the glass (this is called scoring the glass). By scoring your wheel across the glass you create a flaw in the glass. You will guide your cutter along shape you desire to cut then finally you will apply an even pressure to break the glass, you may be able to do this in single clipping or several clippings. Before you get to glass cutting it is really important you have mastered cutting three different kinds of shapes. By practicing cutting a square, circle, and a crescent you will be able to get a better understanding of how glass breaks as you cut it. It is really important to learn what cuts are possible and impossible to do with a hand cutter before you begin actually cutting out your project. Glass can be expensive depending on what you’ve picked out so its best not the waste the good stuff plus the better you at are cutting the less glass you will waste!
STRAIGHT LINE CUTS
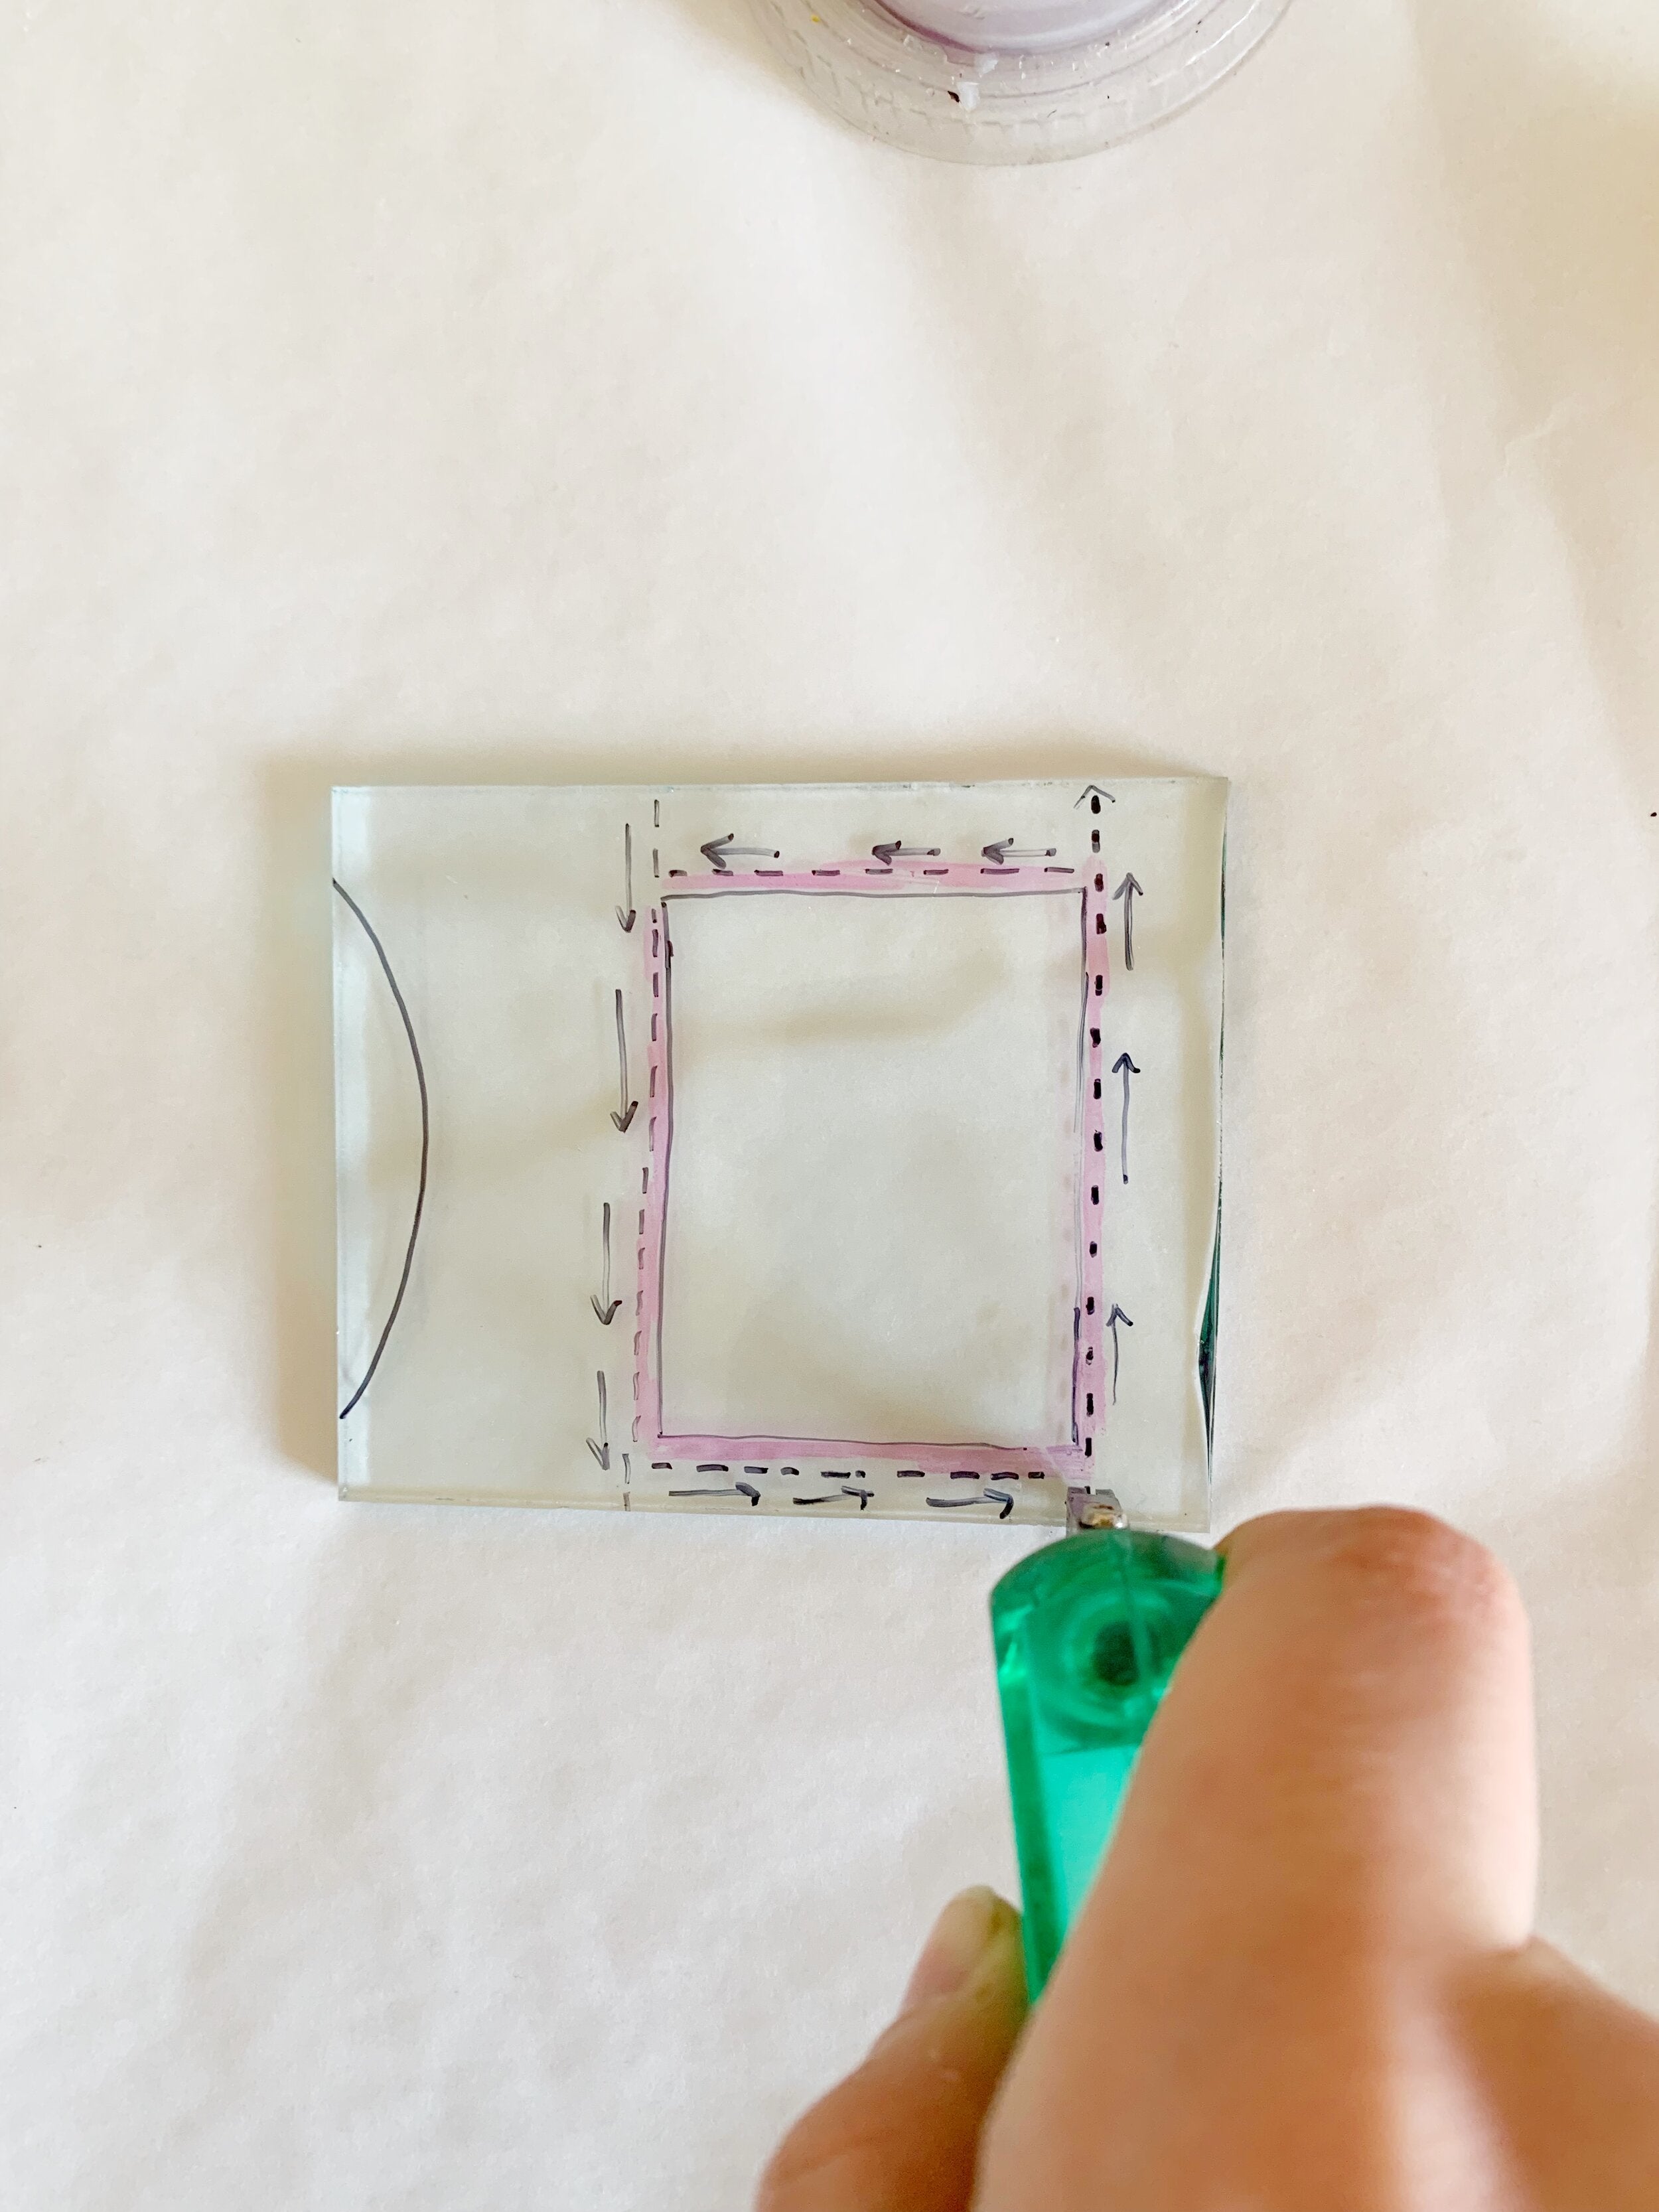
Lets start with the simplest cut: the straight line. To do this we need some scrap glass to practice on. The best kind of glass to do this with if your a beginner is clear, smooth, thin glass (looks like the glass in windows, completely see though). If you can get your hands on a couple of small 3” x 3” scraps thats wonderful if not you will have to cut our some practice scraps for yourself. Take a sharpie and leave ample space around the square.

Now that you’ve drawn your square its time to get practice cutting. First make sure our cutter has oil in it or has been dipped in cutting oil. Hold your cutter and a 90 degree angle to the glass.
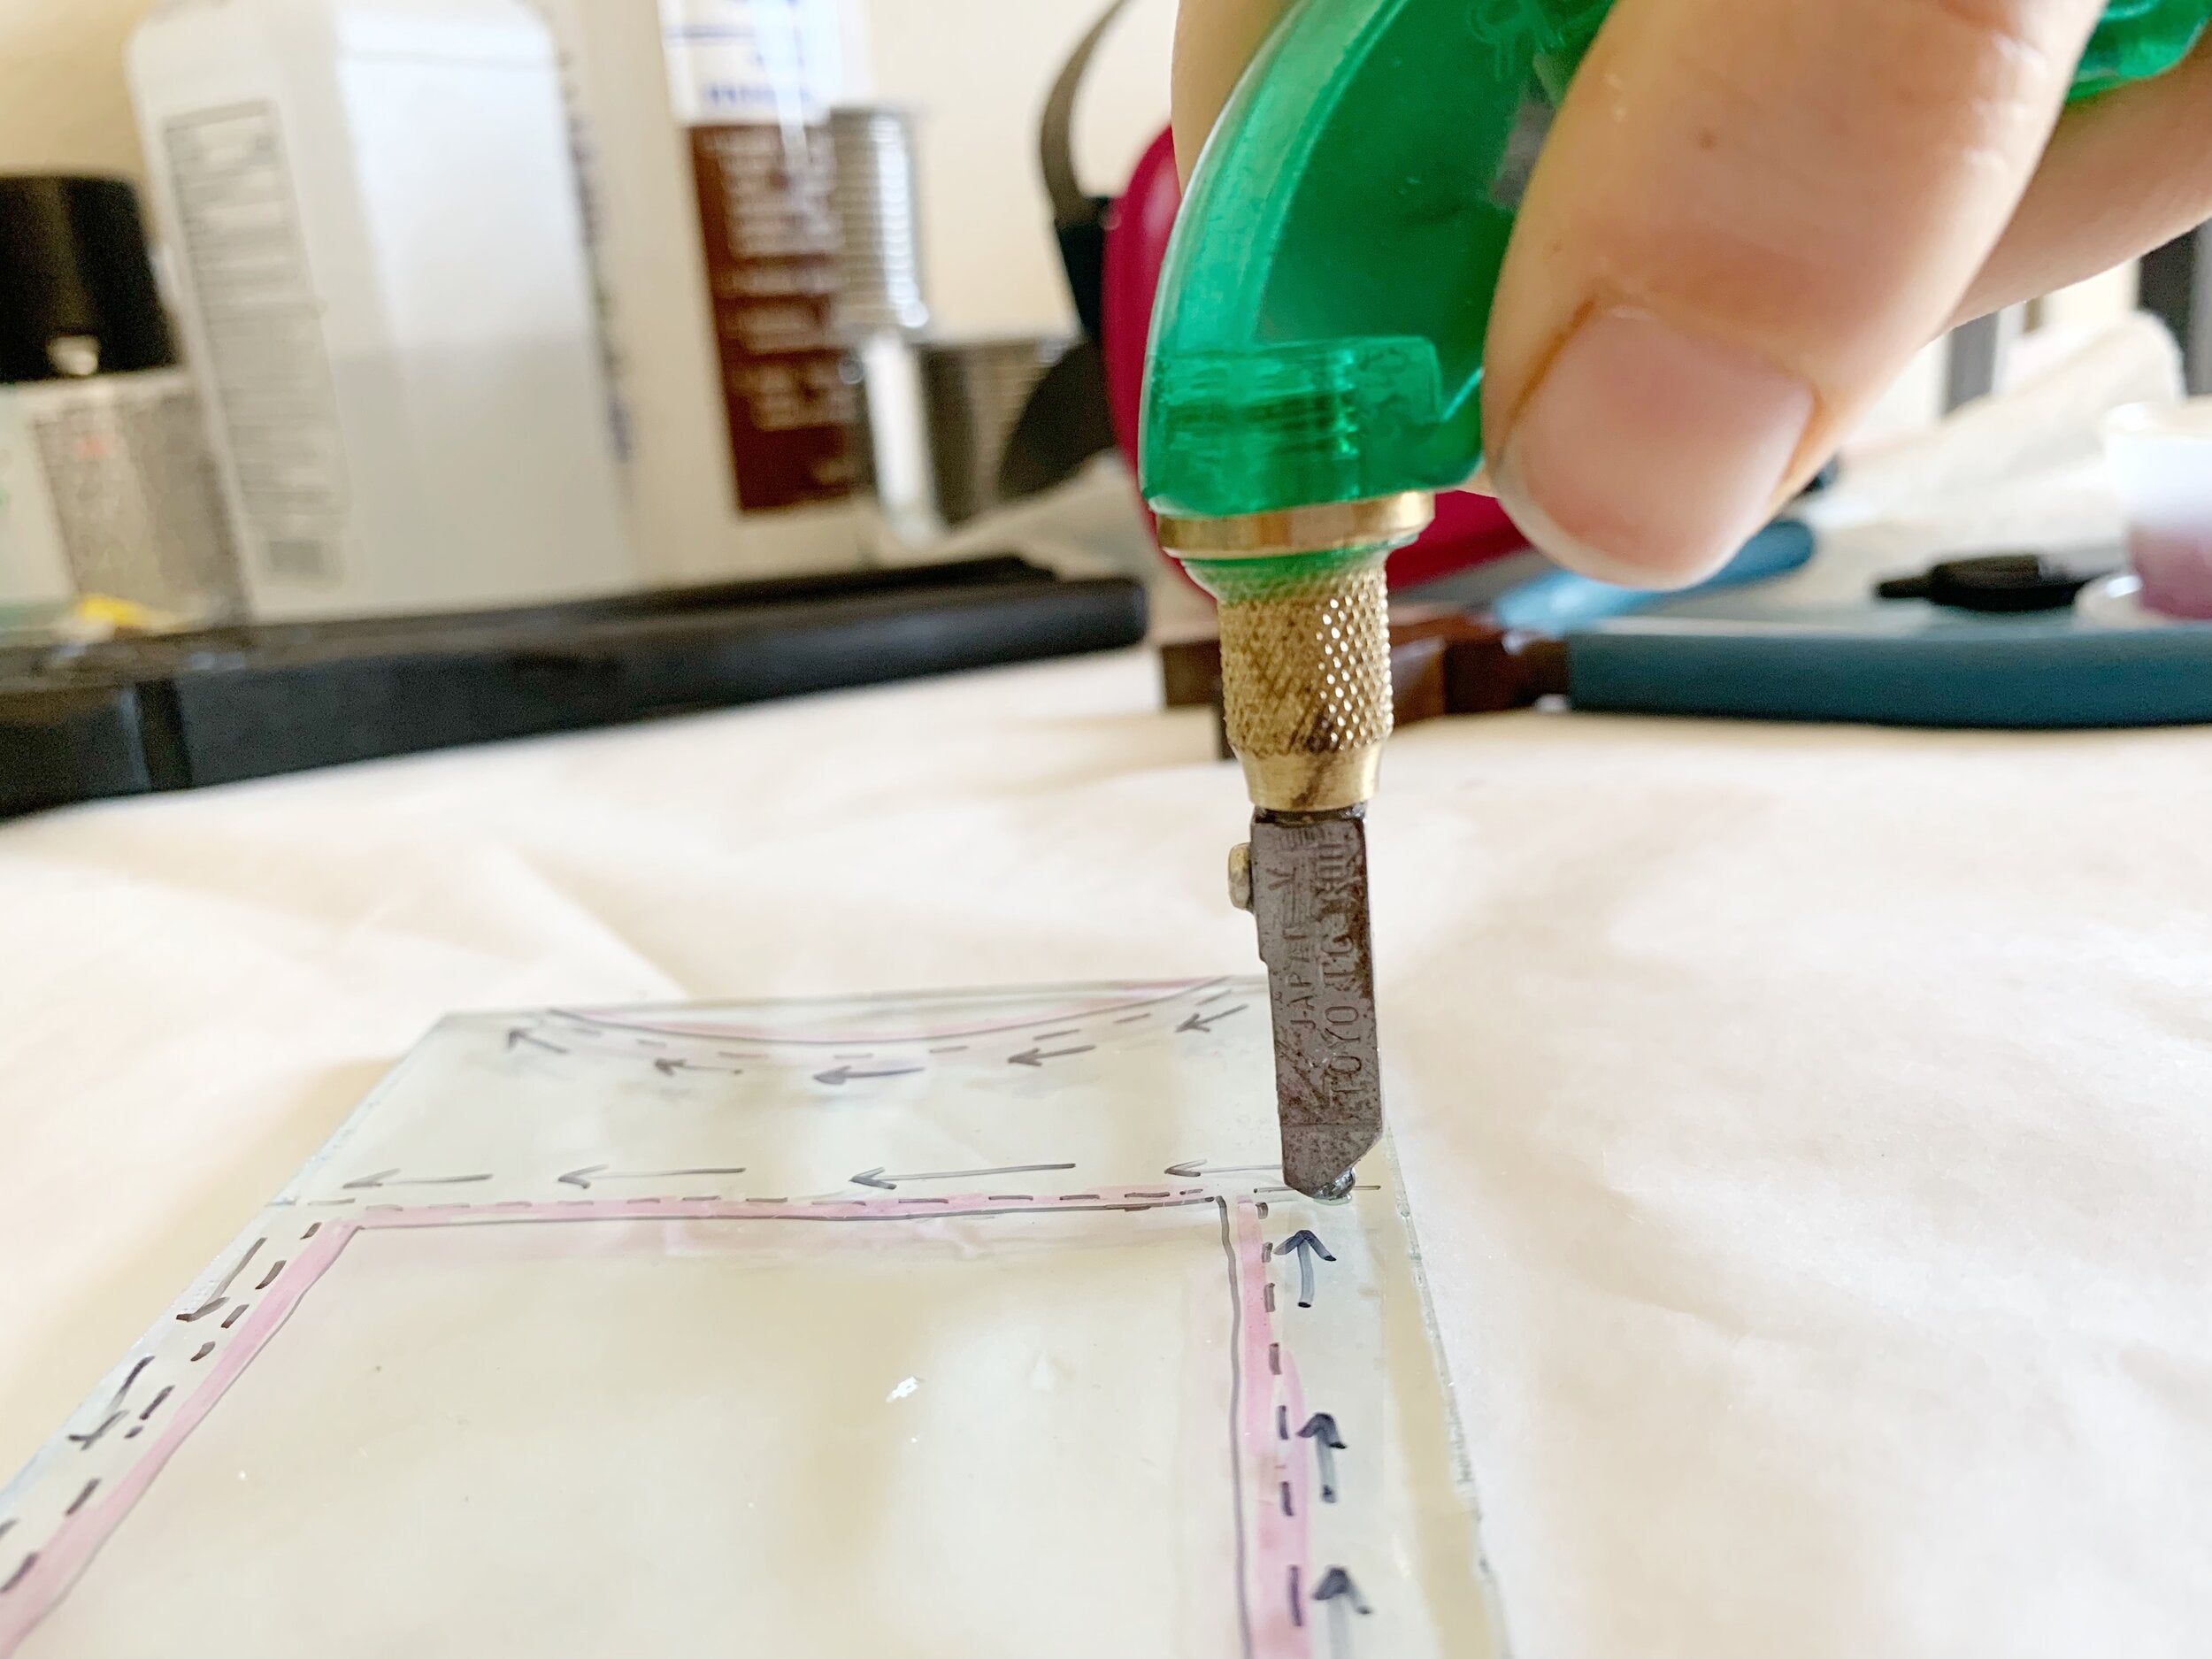
You are going to position your cutter where it is touching the glass at the very edge of the glass from where you’re going to begin your cut.
When you run your glass cutter along the glass following the line you’ve drawn or the tracing paper you want to make sure you’re cutting as close to the line/paper as possible and using a continuous pressure as you run your cutter along the glass. You can use your thumb on the back of your cutter as you run it along the glass as your sort-of guide/stabilizer. It is important once you get to the other side (the end of your cut) to try to not let the cutter go off the edge of the glass but rather stop as close to the edge as you possibly can. Running your cutter off the side of the glass at the end of a cut can damage the cutter over the time. As you cut you should hear a clear scratching sound, this is a good indicator you are putting the right amount of pressure on it.

After your piece is scored its time to break the scraps off with your pliers. Remember for your running pliers: large breaks and grozing pliers: small breaks.


Then tah-dah here is your roughly cut out square, ready to be sanded down with the water grinder! Note sometimes glass doesn’t break how we’d like it to and at times you will have to re-cut pieces if they break too severely to salvage. Hey its all part of the process, just follow the same steps and may it break in your favor the next go around.

OUTSIDE CURVES
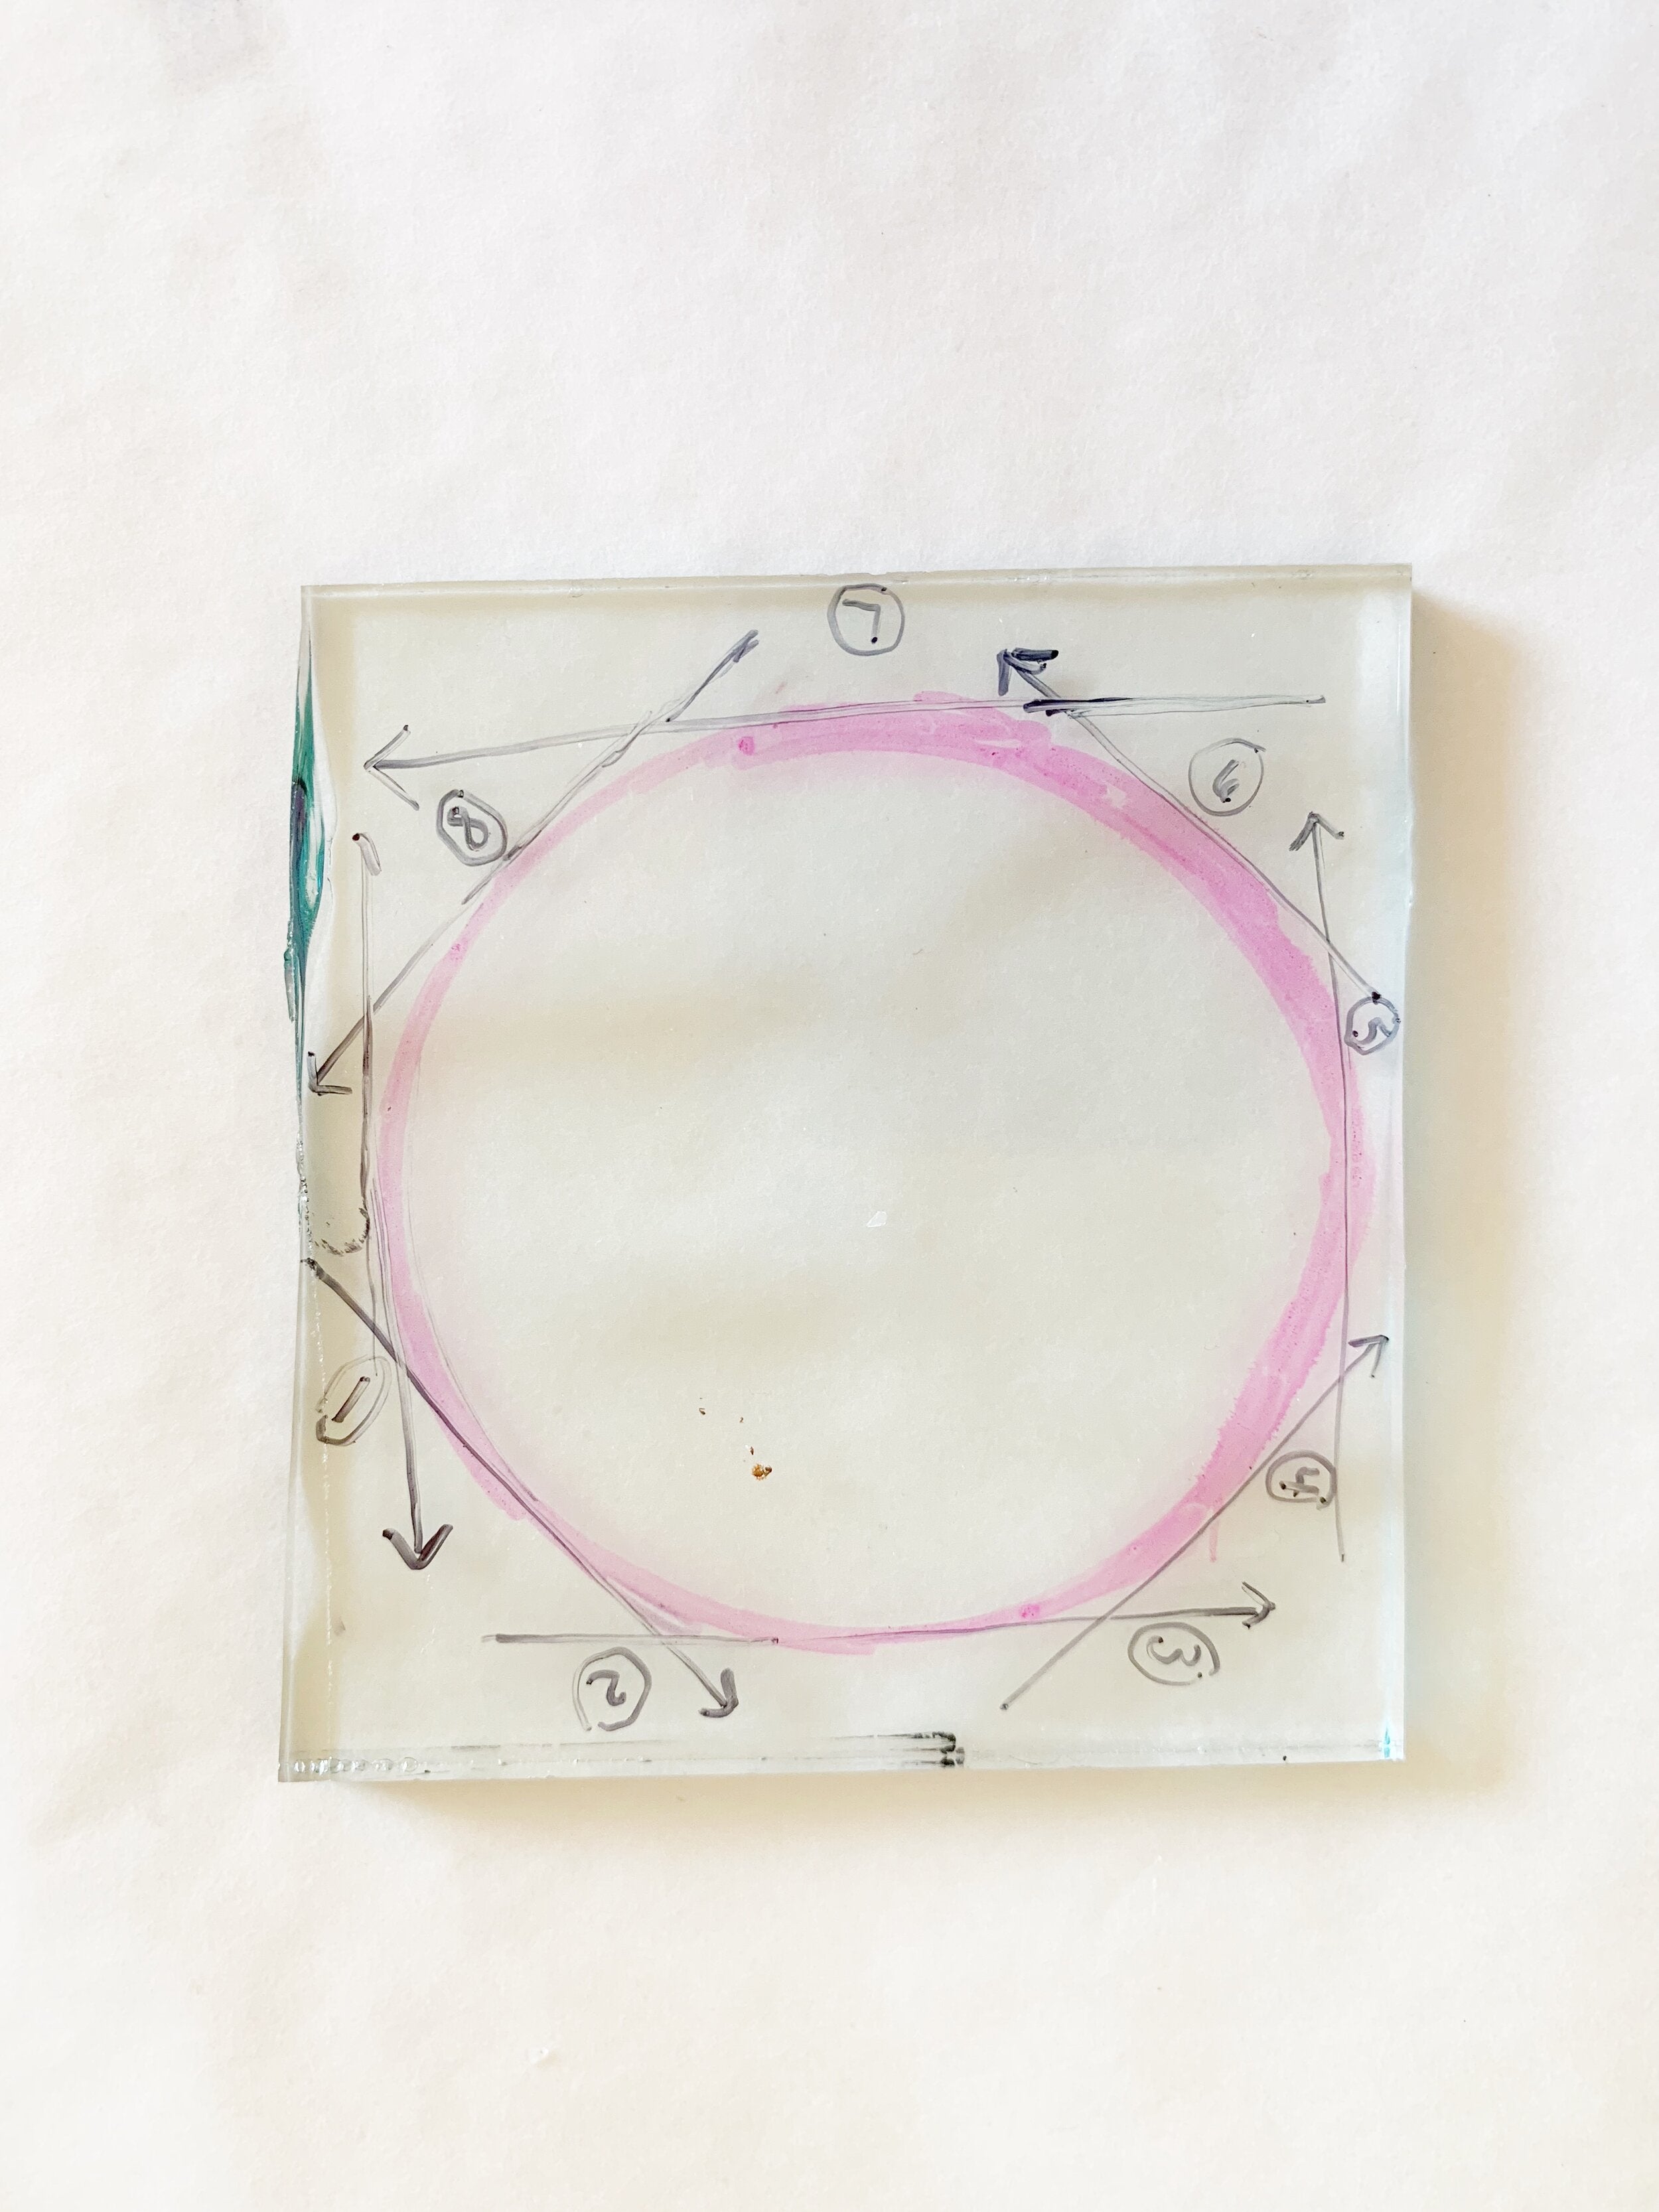
The above example is great for straight lines but what above those curved lines? Once you feel comfortable making straight line breaks outside curves are your next step. These cuts are going to be for your circular or wavy* line cuts (a circle is going to be the best example for you to learn with so I am going to teach you with that shape in mind). Stepping back to figuring out what cuts are possible/impossible; cutting out a circle in one single cut is impossible. The break wants to take the least path of resistance and a circle is not that. When making outside curve cuts you’re almost going to think of it as chipping away at the thing you’d like to cut out, instead of 4 lines its going to be 8 lines as you are slowly going to cut away to avoid any damage. In the below example I have numbered the cut lines so you can get an idea on the order and how many you’ll have to make. The piece is going to look a bit jagged once its cut out but don’t worry too much for that because thats what our handy grinder is for (to smooth out those imperfections). Outside curves will take lots of playing with and some accidental breaks but eventually you will know what risks are okay to take or what will break on you if you make too dramatic of a cut!

*wavy within reason, some wavy cuts won’t be achievable by hand cutting
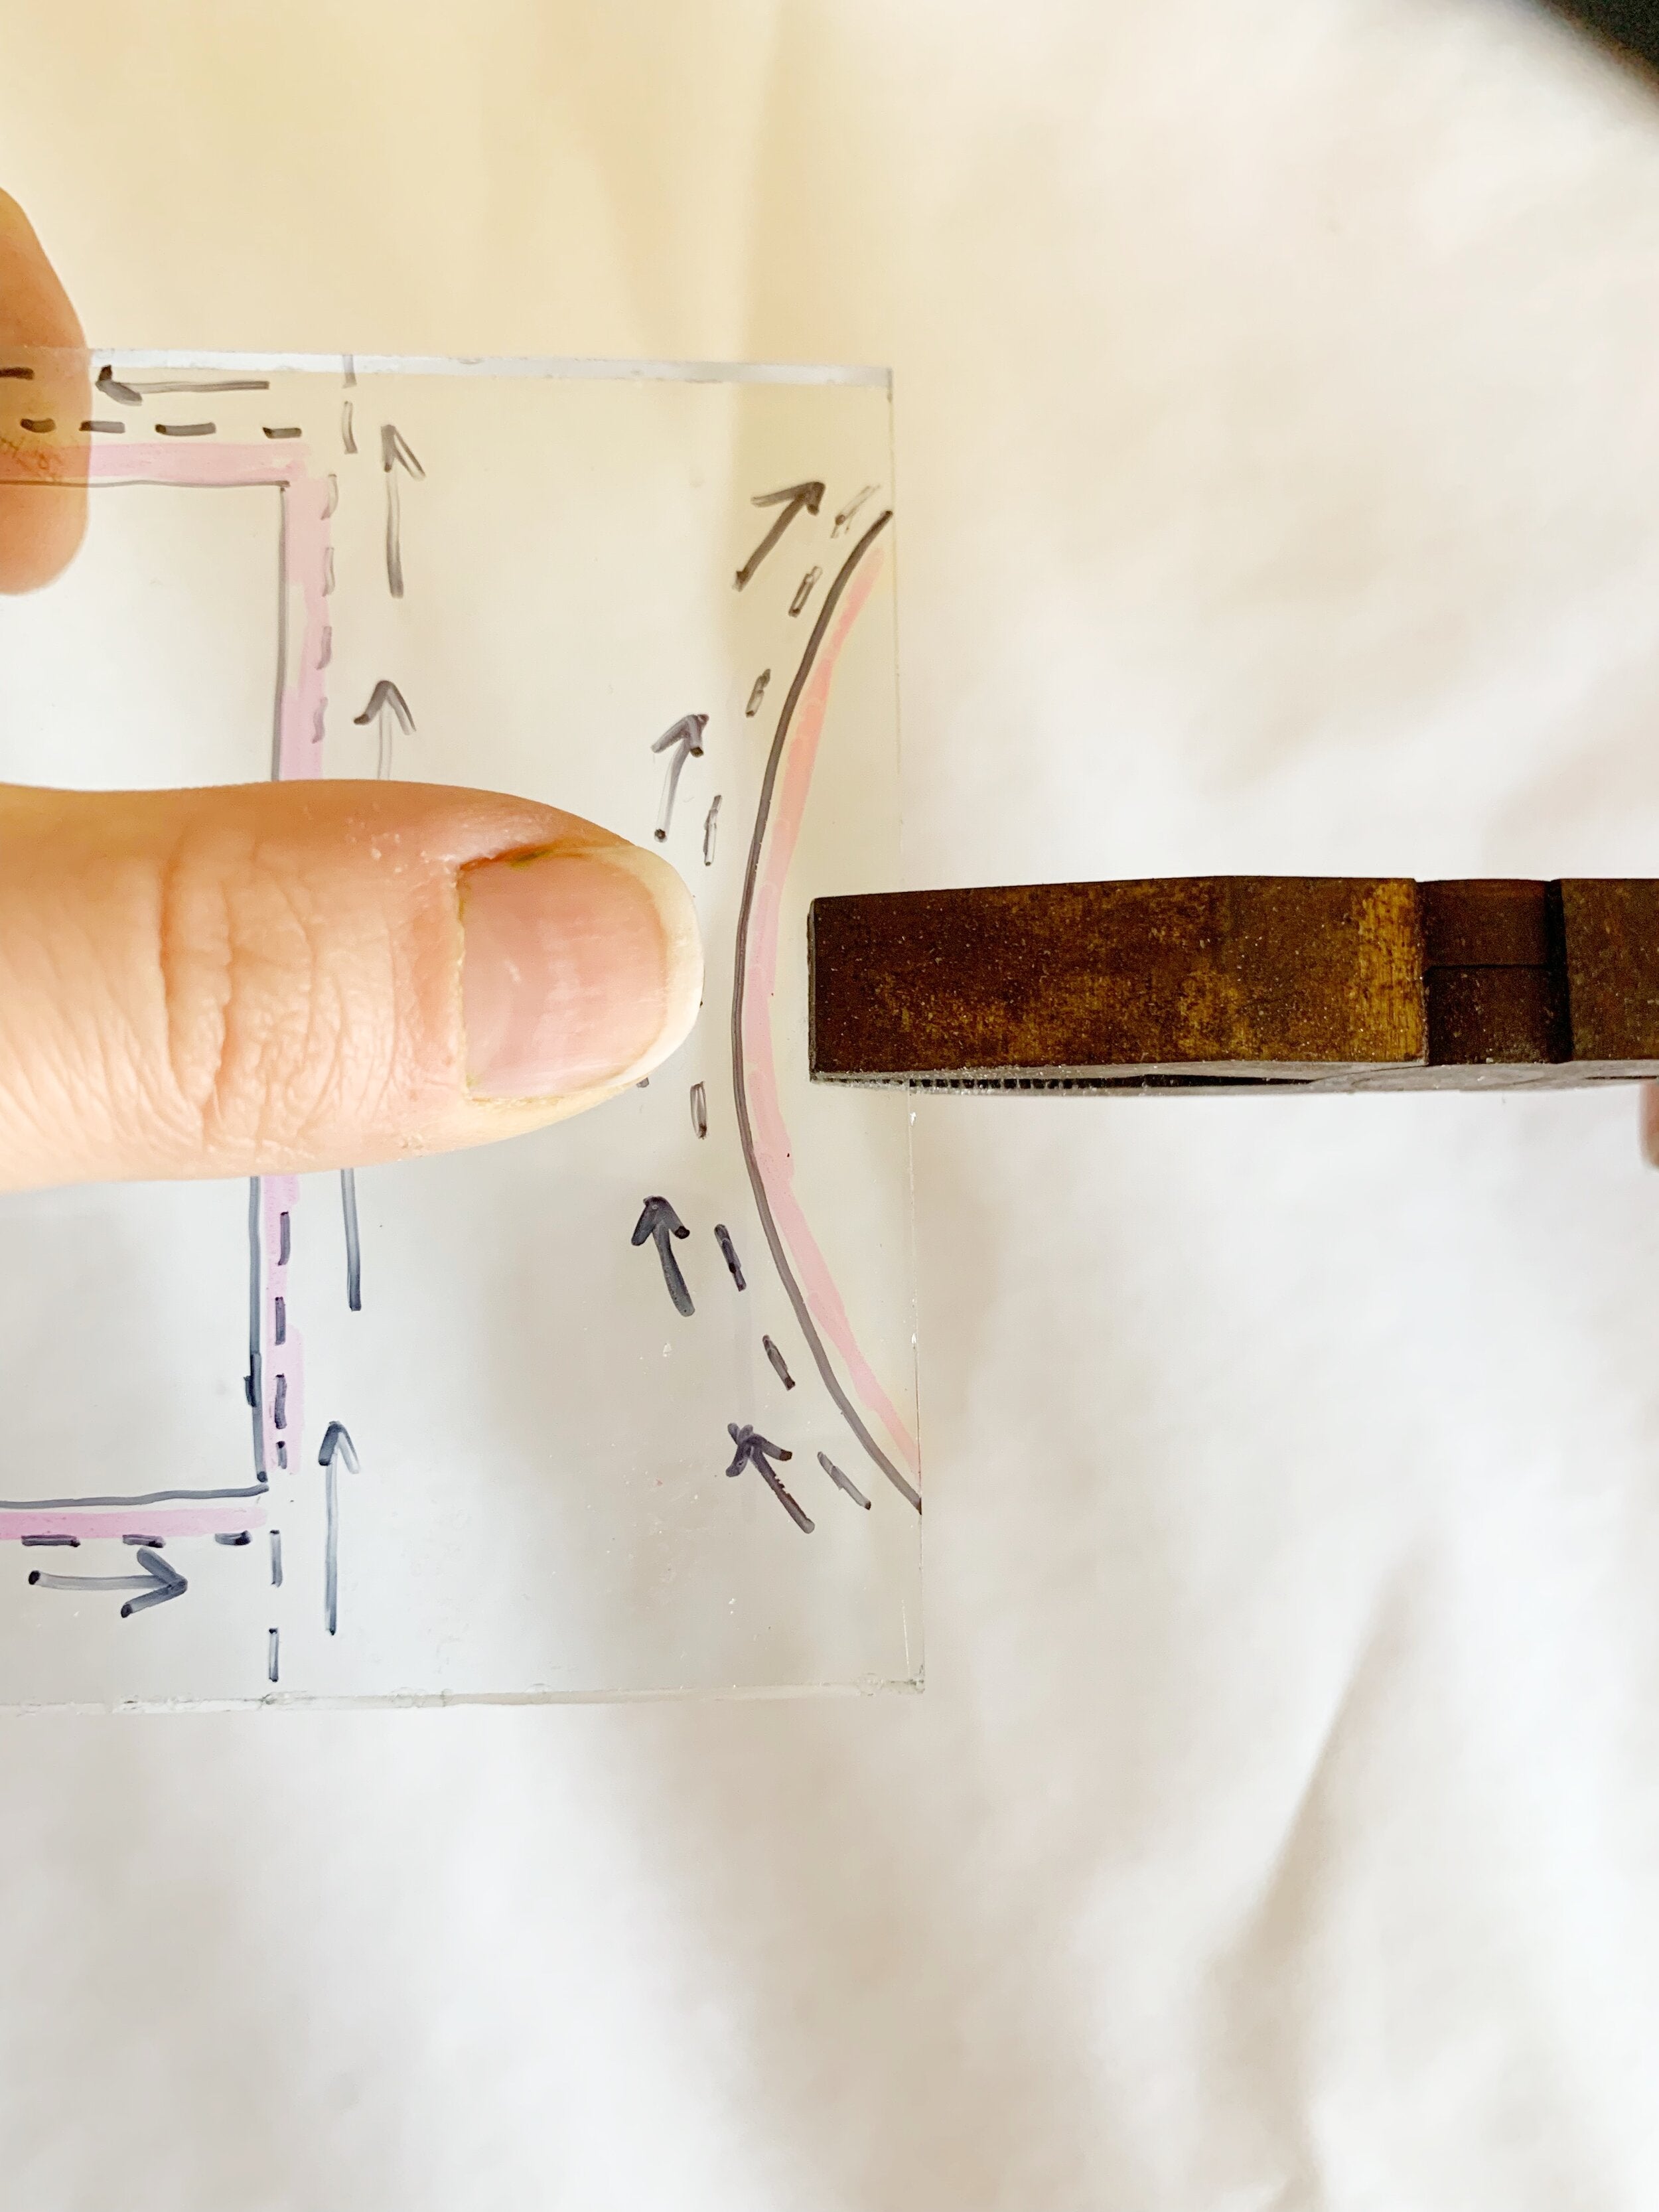
INSIDE CURVES
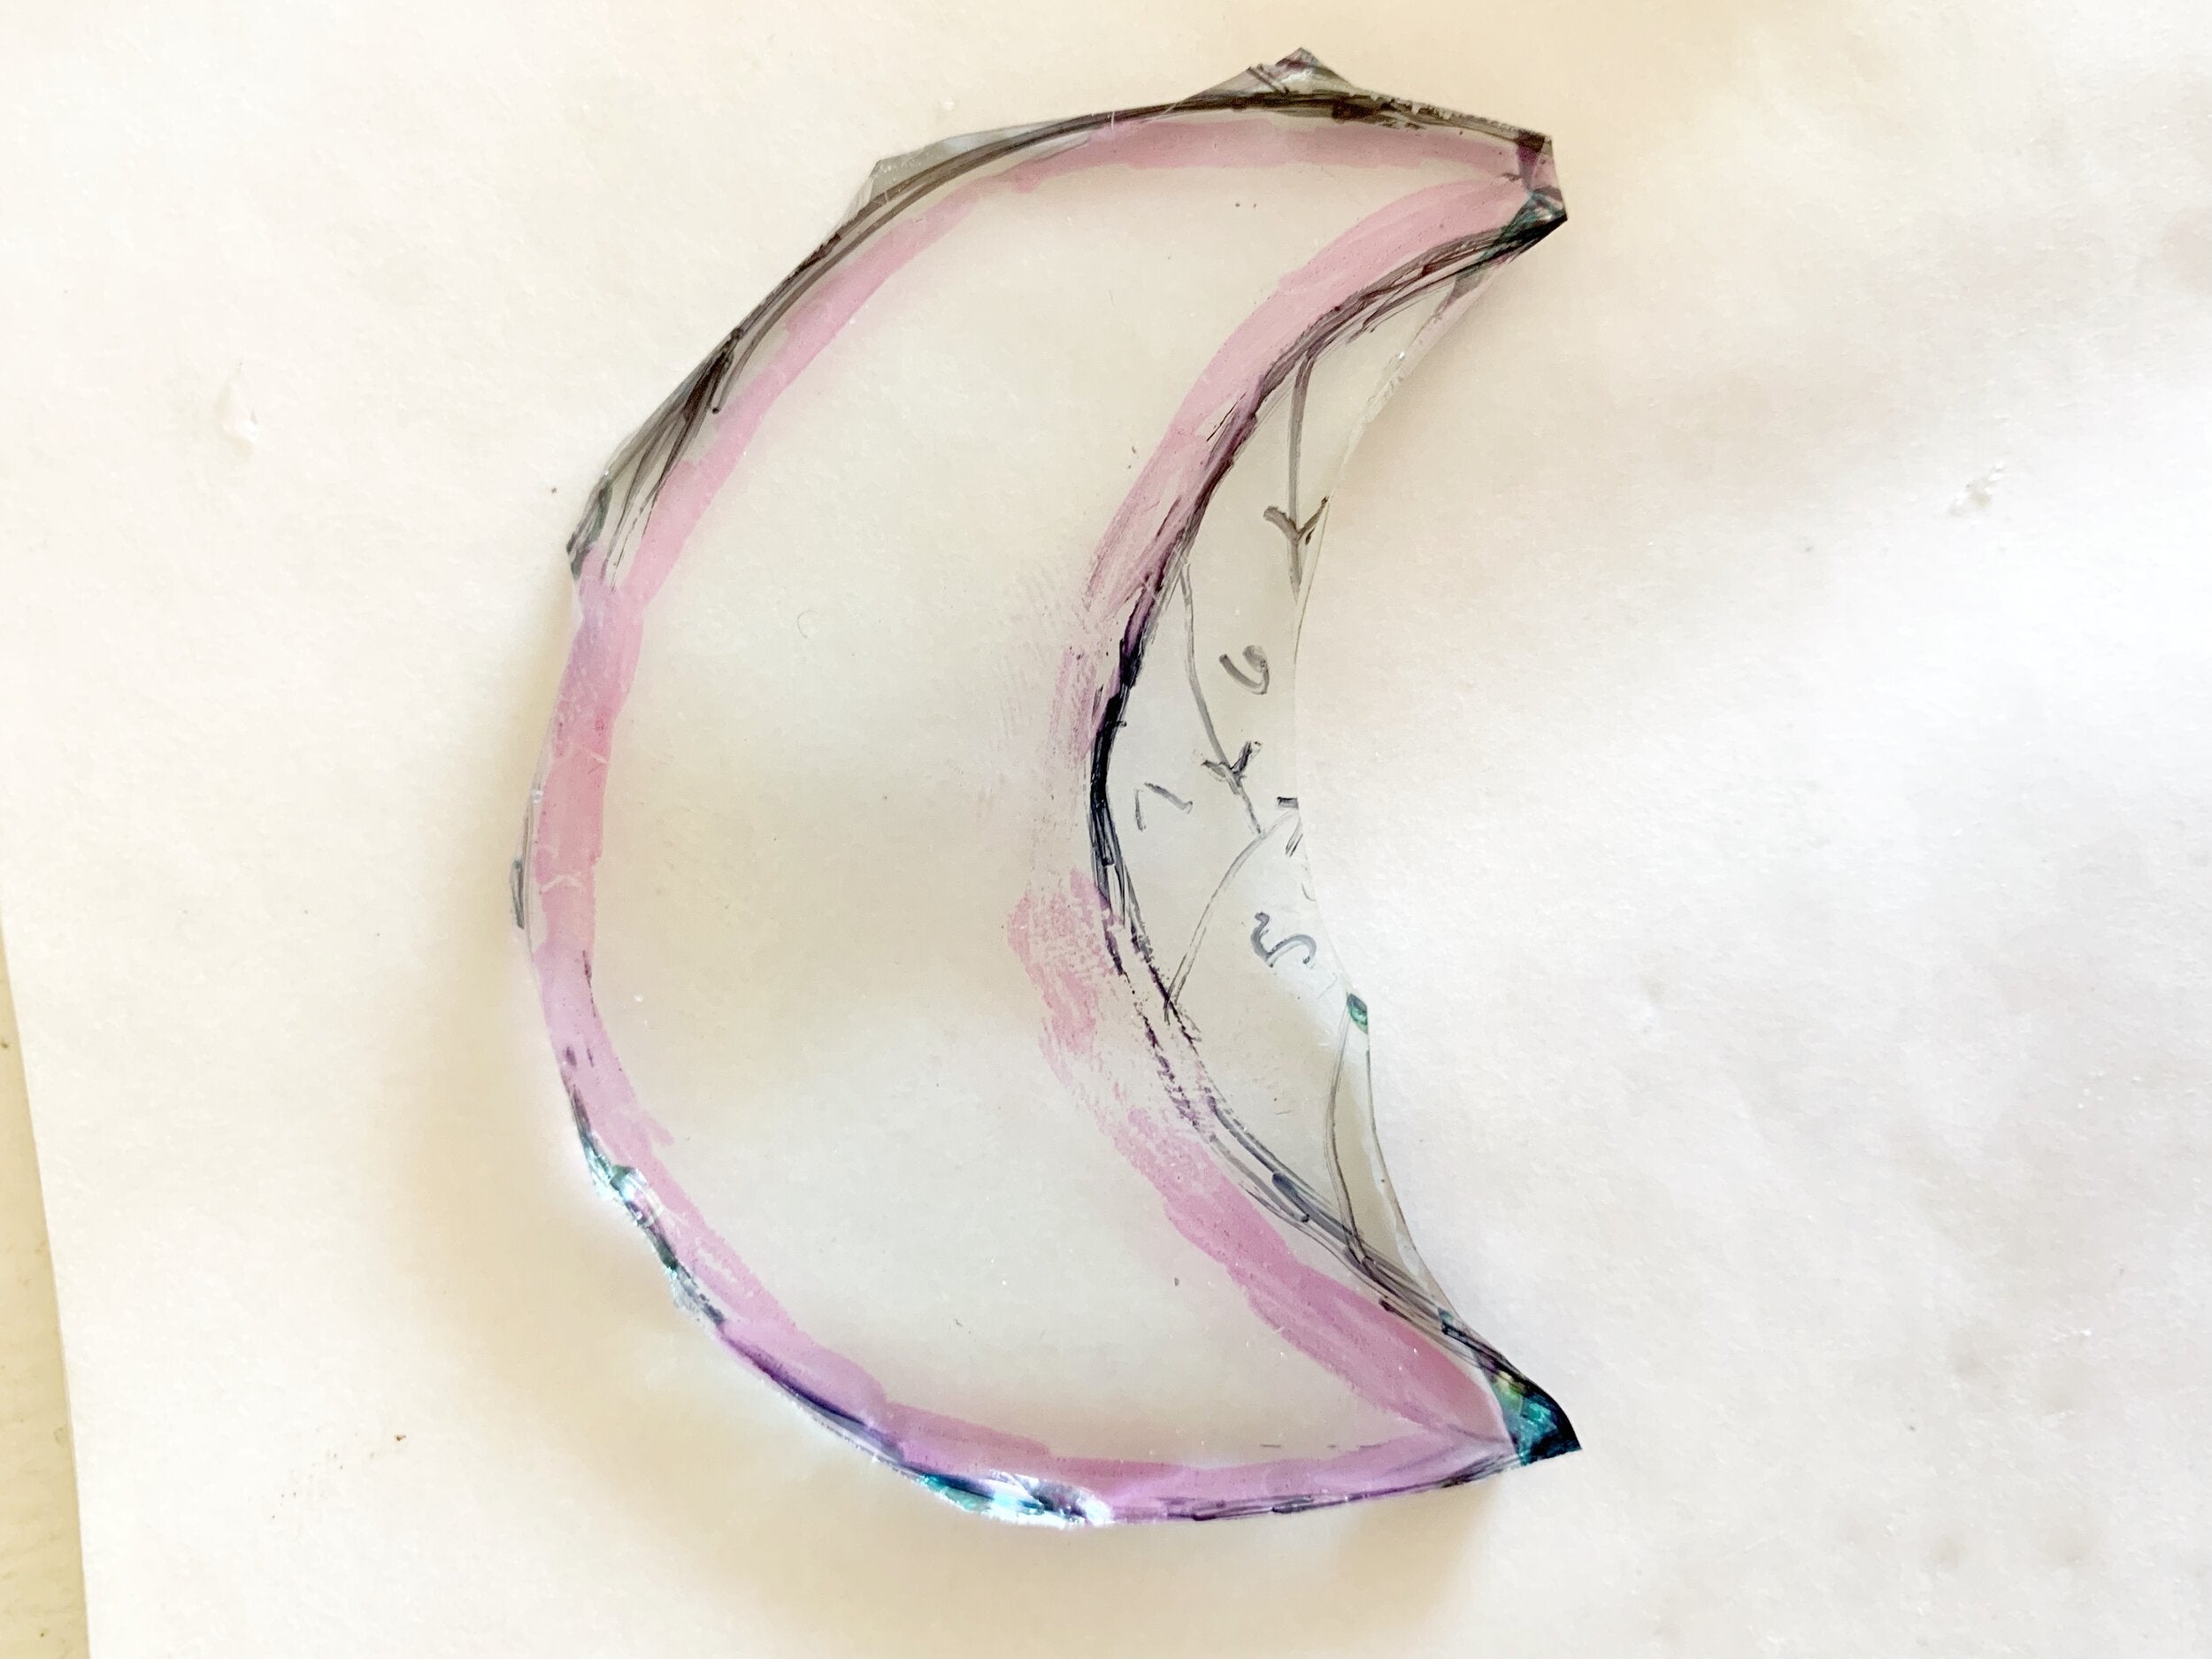
Once you’ve mastered straight line and outside curves now comes the trickiest one: inside curves. This is going to be best taught to you by cutting out a crescent moon shape. First you are going to break off the circular shape side of the glass per our last example with the outside curves. Now that you have your inside curve left its time to slowly chip away at that. Similar to the outside curve you can’t take this break at once so you have to cut away at it but a bit more carefully. The easiest cut to take is your tip to tip straight line cut. After you’ve taken that first cut your are going to make little curved “mountain looking” cuts slowly from each side of the inside curve to keep it balanced. See my below step by step to get a better understanding of my description. Some artists prefer to draw all of their cuts before they begin cutting to have a clear path, that is completely your call. I will warn you these by far are the hardest cuts to make and the most frustrating because you will inevitably shatter a few pieces because your glass cut will opt to take a different path. Again a lot of getting comfortable with this skill is going to come from tons of practice because it isn’t easy.


Keep practicing cutting out these three shapes until you feel comfortable with possible and impossible cuts. Just remember all the pieces you cut will have some sort of combo of these three shapes so if you can try to break down a shape into the cuts you will be making it won’t seem as overwhelming.
WHEN BREAKING GLASS GOES SOUTH
Picture the scene: you in a sunny room on a beautiful afternoon, you’re in the mood to create something beautiful and you managed to snag a couple of downright gorgeous sheets of glass. You start cutting and you’re in the groove. You follow all of the correct steps while scoring and breaking but then when you go to break that beautiful piece of glass. CLICK. It decides to break at a completely different angle and ruins the piece you wanted to cut out. OH NO!
First take a deep breath ask yourself if there is still enough of that glass sheet to recut your piece or do you have spare glass that can be used in its place? It happens to even the most advanced artists and sometimes there happens to be a fault in the glass you just couldn’t have prevented. Its okay to get frustrated because its a big bummer when you have the literal perfect piece of glass selected but at the same time as a glass artist it is important to be a realist and quickly move on to the mindset of “how can I go forward” because you can’t put it back together and fix it. It gets easier as time goes on trust me!
LETS BREAK GLASS
Hey guess what? You are on well your way to being an expert/bad ass stained glass cutter! The best final piece of advice I can give with all of this is continue to practice as much as you can. Over time you will end up getting the hang of the path glass takes and what cuts are possible/impossible to make. Eventually even those scary breaks that you looked at with fear once upon a time wont be scary at all :). Now go cut em’ up friend good luck!
<3 Meggy
stained glass cutting, how to cut stained glass, stained glass cutting tips, stained glass cutting tools, best glass cutter for stained glass, stained glass cutting techniques, glass cutting for beginners, cutting stained glass shapes, stained glass cutting mistakes, stained glass cutting guide, how to score stained glass, stained glass cutting patterns, DIY stained glass cutting, stained glass straight cuts, stained glass inside curves, stained glass outside curves, glass cutter oil tips, using pliers to break stained glass, stained glass cutting safety, stained glass cutting workspace setup, stained glass breaking tips, cutting glass without breaking, stained glass cutting practice, glass scoring techniques, stained glass cutting tools review, stained glass cutter comparison, glass cutting surface recommendations, common glass cutting issues, stained glass precision cutting, stained glass cutting tutorial, stained glass pattern transfer and cutting, cutting wavy lines in stained glass, stained glass project preparation, troubleshooting stained glass cuts, stained glass hand cutting, stained glass cutting setup, beginner stained glass cutting guide, stained glass art cutting techniques, glass cutting efficiency tips, glass cutting ergonomics, stained glass breaking pliers, DIY stained glass patterns and cuts, stained glass cutting precision guide.